
Introduction
After we hear information science, the very first thing that involves thoughts is constructing a mannequin on notebooks and coaching the information. However this isn’t the state of affairs in real-world information science. In the true world, information scientists construct fashions and put them into manufacturing. The manufacturing setting has a niche between the event, deployment, and reliability of the mannequin and to facilitate environment friendly and scalable operations That is the place information scientists use MLOps (Machine Studying Operations) to construct and deploy ML functions in a manufacturing setting. On this article, we are going to construct and deploy a buyer churn prediction challenge utilizing MLOps.

Studying Targets
On this article, you’ll study:
- Overview of the challenge
- We are going to introduce ZenML and MLOPS fundamentals.
- Learn to deploy the mannequin domestically for prediction
- Get into information preprocessing and engineering, coaching, and evaluating the mannequin
This text was printed as part of the Knowledge Science Blogathon.
Overview of the Challenge
Initially, we have to perceive what our challenge is. For this challenge, we’ve a dataset from a telecom firm. Now, to construct a mannequin to foretell if the consumer is prone to proceed the service of the corporate or not. We are going to construct this ML utility through the use of the assistance of ZenmML and MLFlow. That is the workflow of our challenge.
The Workflow of Our Challenge
- Knowledge Assortment
- Knowledge preprocessing
- Coaching Mannequin
- Consider mannequin
- Deployment
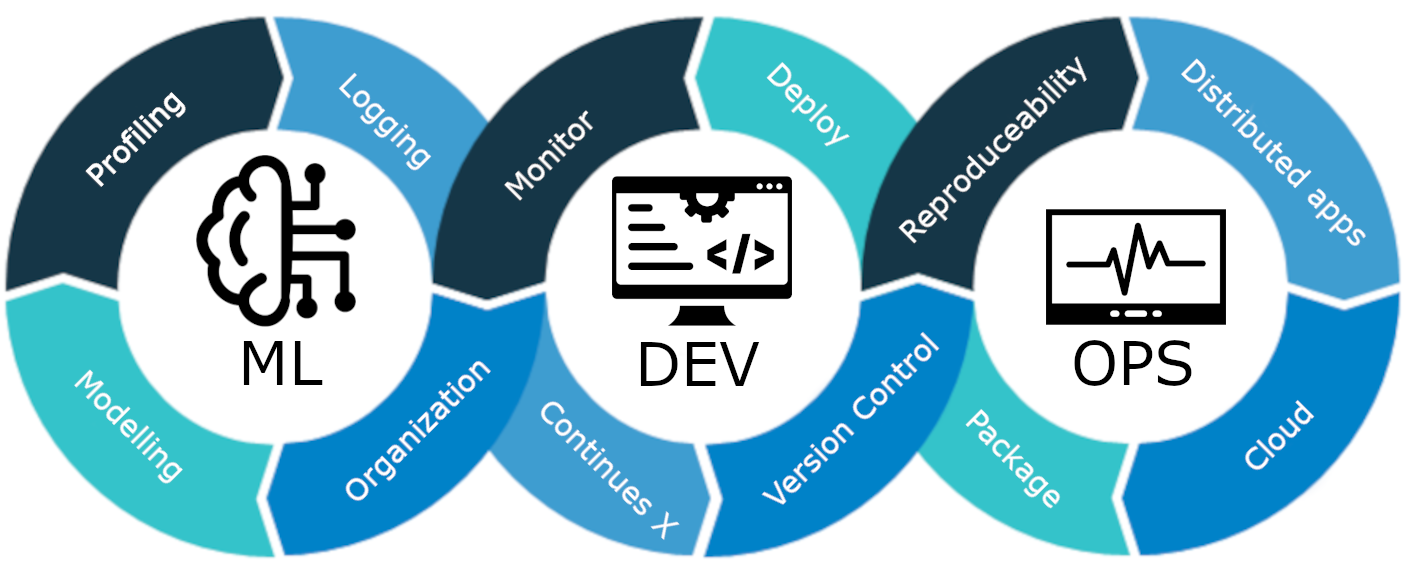
What’s MLOps?
MLOps is an end-to-end machine studying lifecycle, from improvement to deployment and ongoing upkeep. MLOps is the follow of streamlining and automating the whole lifecycle of machine studying fashions, all whereas making certain scalability, reliability, and effectivity.
Let�s clarify it with a easy instance:
Think about you�re establishing a skyscraper in your metropolis. The development of the constructing is accomplished. Nevertheless it lacks electrical energy, water, drainage system, and many others. The skyscraper shall be non-functional and impractical.
The identical applies to machine studying fashions. If these fashions are designed with out taking into the deployment of the mannequin, scalability, and long-term upkeep, they’ll grow to be ineffective and impractical. This poses a serious hurdle for information scientists when establishing machine studying fashions to be used in manufacturing environments.
MLOps is a set of greatest practices and methods that information the manufacturing, deployment, and long-term upkeep of machine studying fashions. It ensures that these fashions not solely ship correct predictions but additionally stay strong, scalable, and priceless belongings for corporations. So, with out MLOps, it is going to be a nightmare to do all these duties effectively, which is difficult. On this challenge, we are going to clarify how MLOps works, totally different levels, and an end-to-end challenge on methods to construct a Buyer churn prediction mannequin.
Introducing ZenML
ZenML is an open-source MLOPS Framework that helps to construct transportable and production-ready pipelines. The ZenML Framework will assist us do that challenge utilizing MLOPS.
?? If you’re a Home windows consumer, attempt to set up wsl on a PC. Zenml will not be supported in Home windows.
Earlier than we transfer on to the tasks.
Basic Ideas of MLOPS
- Steps: Steps are single models of duties in a pipeline or workflow. Every step represents a selected motion or operation that must be carried out to develop a machine-learning workflow. For instance, information cleansing, information preprocessing, coaching fashions, and many others., are sure steps in growing a machine studying mannequin.
- Pipelines: They join a number of steps collectively to create a structured and automatic course of for machine studying duties. for, e.g., the information processing pipeline, the mannequin analysis pipeline, and the mannequin coaching pipeline.
Getting Began
Create a digital setting for the challenge:
conda create -n churn_prediction python=3.9Then set up these libraries:
pip set up numpy pandas matplotlib scikit-learnAfter putting in this, set up ZenML:
pip set up zenml["server"]Then initialize ZenML repository.
zenml init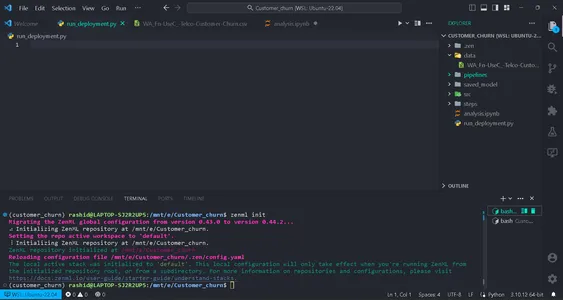
You’ll get a inexperienced flag to maneuver on in case your display screen exhibits this. After initializing a folder .zenml shall be created in your listing.
Create a folder for information within the listing. Get the information at this hyperlink:
Create folders in line with this construction.
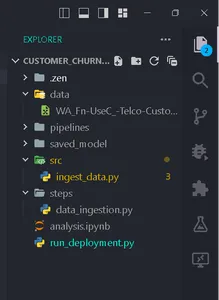
Knowledge Assortment
On this step, we’re going to import information from our csv file. This information shall be used for coaching the mannequin after cleansing and encoding.
Create a file ingest_data.py contained in the folder steps.
import pandas as pd
import numpy as np
import logging
from zenml import step


class IngestData:
    """
    Ingesting information to the workflow.
    """
    def __init__(self, path:str) -> None:
        """
        Args:
            data_path(str): path of the datafile
        """
        self.path = path

    def get_data(self):
        df = pd.read_csv(self.path)
        logging.data("Studying csv file efficiently accomplished.")
        return df


@step(enable_cache = False)
def ingest_df(data_path:str) -> pd.DataFrame:
    """
    ZenML step for ingesting information from a CSV file.

    """
    strive:
        #Creating an occasion of IngestData class and ingest the information
        ingest_data = IngestData(data_path)
        df = ingest_data.get_data()
        logging.data("Ingesting information accomplished")
        return df
    besides Exception as e:
        #Log an error message if information ingestion fails and lift the exception
        logging.error("Error whereas ingesting information")
        increase e
Right here is the challenge�hyperlink.
On this code, we first created the category IngestData to encapsulate the information ingestion logic. Then we created a ZenML step, ingest_df, which is a person unit of the information assortment pipeline.
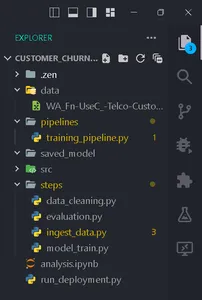
Making a file training_pipeline.py contained in the folder pipeline.
Write the Code
from zenml import pipeline

from steps.ingest_data import ingest_df

#Outline a ZenML pipeline known as training_pipeline.

@pipeline(enable_cache=False)
def train_pipeline(data_path:str):
    '''
    Knowledge pipeline for coaching the mannequin.

    Args:
        data_path (str): The trail to the information to be ingested.
    '''
    df = ingest_df(data_path=data_path)
Right here, we’re making a coaching pipeline for coaching a machine studying mannequin utilizing a collection of steps.
Then create a file named run_pipeline.py within the base listing to run the pipeline.
from pipelines.training_pipeline import train_pipeline

if __name__ == '__main__':
    #Run the pipeline
    train_pipeline(data_path="/mnt/e/Customer_churn/information/WA_Fn-UseC_-Telco-Buyer-Churn.csv")
This code is used for working the pipeline.
So now we’ve completed the Knowledge ingestion pipeline. Let�s run it.
Run the command in your terminal:
python run_pipeline.py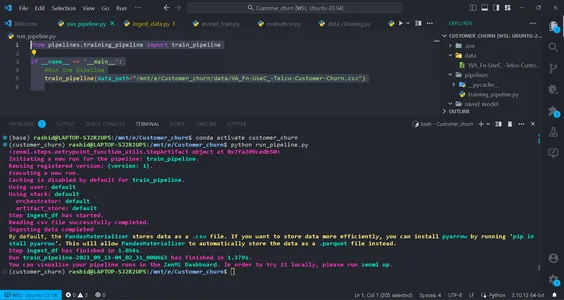
Then, you possibly can see the instructions, which point out that training_pipeline has been efficiently accomplished.
Knowledge Preprocessing
On this step, we are going to create totally different methods for cleansing information. The undesirable columns are dropped, and categorical columns shall be encoded utilizing Label encoding. Lastly, the information shall be cut up into coaching and testing information.
Create a file known as clean_data.py within the src Folder.
On this file, we are going to create courses of methods for cleansing the information.
import pandas as pd
import numpy as np
import logging
from sklearn.model_selection import train_test_split
from abc import abstractmethod, ABC
from typing import Union
from sklearn.preprocessing import LabelEncoder

class DataStrategy(ABC):
    @abstractmethod
    def handle_data(self, df:pd.DataFrame) -> Union[pd.DataFrame,pd.Series]:
        cross


# Knowledge Preprocessing technique
class DataPreprocessing(DataStrategy):
    def handle_data(self, df: pd.DataFrame) -> Union[pd.DataFrame, pd.Series]:
        strive:
            df['TotalCharges'] = df['TotalCharges'].exchange(' ', 0).astype(float)
            df.drop('customerID', axis=1, inplace=True)
            df['Churn'] = df['Churn'].exchange({'Sure': 1, 'No': 0}).astype(int)
            service = ['PhoneService', 'MultipleLines', 'InternetService', 'OnlineSecurity',
                       'OnlineBackup', 'DeviceProtection', 'TechSupport', 'StreamingTV',
                       'StreamingMovies']
            for col in service:
                df[col] = df[col].exchange({'No cellphone service': 'No', 'No web service': 'No'})
            logging.data("Size of df: ", len(df.columns))
            return df
        besides Exception as e:
            logging.error("Error in Preprocessing", e)
            increase e

# Characteristic Encoding Technique
class LabelEncoding(DataStrategy):
    def handle_data(self, df: pd.DataFrame) -> Union[pd.DataFrame, pd.Series]:
        strive:
            df_cat = ['gender', 'Partner', 'Dependents', 'PhoneService', 'MultipleLines',
                      'InternetService', 'OnlineSecurity', 'OnlineBackup', 'DeviceProtection',
                      'TechSupport', 'StreamingTV',  'StreamingMovies', 'Contract',
                      'PaperlessBilling', 'PaymentMethod']
            lencod = LabelEncoder()
            for col in df_cat:
                df[col] = lencod.fit_transform(df[col])
            logging.data(df.head())
            return df
        besides Exception as e:
            logging.error(e)
            increase e

# Knowledge splitting Technique
class DataDivideStrategy(DataStrategy):
    def handle_data(self, df:pd.DataFrame) -> Union[pd.DataFrame, pd.Series]:
        strive:
            X = df.drop('Churn', axis=1)
            y = df['Churn']
            X_train, X_test, y_train, y_test = train_test_split(X, y, test_size=0.2, random_state=1)
            return X_train, X_test, y_train, y_test
        besides Exception as e:
            logging.error("Error in DataDividing", e)
            increase e
This code implements a modular information preprocessing pipeline for machine studying. It contains methods for information preprocessing, function encoding, and Knowledge Encoding steps of information cleansing for predictive modeling.
1. DataPreprocessing: This class is answerable for eradicating undesirable columns and dealing with lacking values (NA values) within the dataset.
2. LabelEncoding: The LabelEncoding class is designed to encode categorical variables right into a numerical format that machine studying algorithms can work with successfully. It transforms text-based classes into numeric values.
3. DataDivideStrategy: This class separates the dataset into impartial variables(X) and dependent variables (y). Then, it splits the information into coaching and testing units.
We are going to implement them step-by-step to arrange our information for machine studying duties.
These methods guarantee the information is structured and formatted appropriately for mannequin coaching and analysis.
Create data_cleaning.py within the steps folder.
import pandas as pd
import numpy as np
from src.clean_data import DataPreprocessing, DataDivideStrategy, LabelEncoding
import logging
from typing_extensions import Annotated
from typing import Tuple
from zenml import step

# Outline a ZenML step for cleansing and preprocessing information
@step(enable_cache=False)
def cleaning_data(df: pd.DataFrame) -> Tuple[
    Annotated[pd.DataFrame, "X_train"],
    Annotated[pd.DataFrame, "X_test"],
    Annotated[pd.Series, "y_train"],
    Annotated[pd.Series, "y_test"],
]:
    strive:
        # Instantiate the DataPreprocessing technique
        data_preprocessing = DataPreprocessing()

        # Apply information preprocessing to the enter DataFrame
        information = data_preprocessing.handle_data(df)

        # Instantiate the LabelEncoding technique
        feature_encode = LabelEncoding()

        # Apply label encoding to the preprocessed information
        df_encoded = feature_encode.handle_data(information)

        # Log details about the DataFrame columns
        logging.data(df_encoded.columns)
        logging.data("Columns:", len(df_encoded))

        # Instantiate the DataDivideStrategy technique
        split_data = DataDivideStrategy()

        # Break up the encoded information into coaching and testing units
        X_train, X_test, y_train, y_test = split_data.handle_data(df_encoded)

        # Return the cut up information as a tuple
        return X_train, X_test, y_train, y_test
    besides Exception as e:
        # Deal with and log any errors that happen throughout information cleansing
        logging.error("Error in step cleansing information", e)
        increase e
On this step, we applied the methods we created in clean_data.py
Let�s implement this step in training_pipeline.py
from zenml import pipeline

#importing steps
from steps.ingest_data import ingest_df
from steps.data_cleaning import cleaning_data
import logging

#Outline a ZenML pipeline known as training_pipeline.
@pipeline(enable_cache=False)
def train_pipeline(data_path:str):
    '''
    Knowledge pipeline for coaching the mannequin.
    '''
    df = ingest_df(data_path=data_path)

X_train, X_test, y_train, y_test = cleaning_data(df=df)That�s it; we’ve accomplished our information preprocessing step within the coaching pipeline.
Mannequin Coaching
Now, we’re going to construct the mannequin for this challenge. Right here, we’re predicting a binary classification drawback. We are able to use logistic regression. Our focus is not going to be on the accuracy of the mannequin. Will probably be based mostly on the MLOps half.
For individuals who don�t find out about logistic regression, you possibly can examine it right here. We are going to implement the identical steps we did within the information preprocessing step. First, we are going to create a file training_model.py within the src folder.
import pandas as pd
from sklearn.linear_model import LogisticRegression
from abc import ABC, abstractmethod
import logging


#Summary mannequin
class Mannequin(ABC):
    @abstractmethod
    def prepare(self,X_train:pd.DataFrame,y_train:pd.Sequence):
        """
        Trains the mannequin on given information
        """
        cross


class LogisticReg(Mannequin):
    """
    Implementing the Logistic Regression mannequin.
    """
    def prepare(self, X_train: pd.DataFrame, y_train: pd.Sequence):
        """
        Coaching the mannequin

        Args:
            X_train: pd.DataFrame,
            y_train: pd.Sequence
        """
        logistic_reg = LogisticRegression()
        logistic_reg.match(X_train,y_train)
        return logistic_reg
We outline an summary Mannequin class with a �prepare� technique that every one fashions should implement. The LogisticReg class is a selected implementation utilizing logistic regression. The following step entails configuring a file named config.py within the steps folder. Create a file named config.py within the steps folder.
Configuring Mannequin Parameters
from zenml.steps import BaseParameters


"""
This file is used for used for configuring
and specifying varied parameters associated to
your machine studying fashions and coaching course of
"""

class ModelName(BaseParameters):
    """
    Mannequin configurations
    """
    model_name: str = "logistic regression"
Within the file named config.py, contained in the steps folder, you�re configuring parameters associated to your machine-learning mannequin. You create a ModelName class�that inherits from BaseParameters to specify the mannequin identify. This makes it simple to vary the mannequin kind.
import logging

import pandas as pd
from src.training_model import LogisticReg
from zenml import step
from .config import ModelName


#Outline a step known as train_model
@step(enable_cache=False)
def train_model(X_train:pd.DataFrame,y_train:pd.Sequence,config:ModelName):
    """
    Trains the information based mostly on the configured mannequin

    """
    strive:
        mannequin = None
        if config == "logistic regression":
            mannequin = LogisticReg()
        else:
            increase ValueError("Mannequin identify will not be supported")

        trained_model = mannequin.prepare(X_train=X_train,y_train=y_train)
        return trained_model

    besides Exception as e:
        logging.error("Error in step coaching mannequin",e)
        increase e
Within the file named model_train.py within the steps folder, outline a step known as train_model utilizing ZenML. The aim of this step is to coach a machine-learning mannequin based mostly on the identify of the mannequin in ModelName.
In this system
Test the configured mannequin identify. If it�s �logistic regression,� we created an occasion of the LogisticReg mannequin and skilled it with the offered coaching information (X_train and y_train). If the mannequin identify will not be supported, you increase an error. Any errors throughout this course of are logged, and the error is raised.
After this, we’re going to implement this step in training_pipeline.py
from zenml import pipeline


from steps.ingest_data import ingest_df
from steps.data_cleaning import cleaning_data
from steps.model_train import train_model
import logging

#Outline a ZenML pipeline known as training_pipeline.
@pipeline(enable_cache=False)
def train_pipeline(data_path:str):
    '''
    Knowledge pipeline for coaching the mannequin.
    '''
    #step ingesting information: returns the information.
    df = ingest_df(data_path=data_path)
    #step to scrub the information.
    X_train, X_test, y_train, y_test = cleaning_data(df=df)
    #coaching the mannequin
    mannequin = train_model(X_train=X_train,y_train=y_train)
Now, we’ve applied the train_model step within the pipeline. So, the model_train.py step is accomplished.
Evaluating Mannequin
On this step, we are going to consider how environment friendly our mannequin is. For that, we are going to test the accuracy rating in predicting the testing information. So first, we’re going to create the methods we’re going to use within the pipeline.
Create a file named evaluate_model.py in folder src.
import logging
from sklearn.metrics import confusion_matrix, classification_report, accuracy_score
from abc import ABC, abstractmethod
import numpy as np

# Summary class for mannequin analysis
class Consider(ABC):
    @abstractmethod
    def evaluate_model(self, y_true: np.ndarray, y_pred: np.ndarray) -> float:
        """
        Summary technique to guage a machine studying mannequin's efficiency.

        Args:
            y_true (np.ndarray): True labels.
            y_pred (np.ndarray): Predicted labels.

        Returns:
            float: Analysis end result.
        """
        cross


#Class to calculate accuracy rating
class Accuracy_score(Consider):
    """
        Calculates and returns the accuracy rating for a mannequin's predictions.

    """

    def evaluate_model(self, y_true: np.ndarray, y_pred: np.ndarray) -> float:
        strive:
            accuracy_scr = accuracy_score(y_true=y_true, y_pred=y_pred) * 100
            logging.data("Accuracy_score:", accuracy_scr)
            return accuracy_scr
        besides Exception as e:
            logging.error("Error in evaluating the accuracy of the mannequin",e)
            increase e
#Class to calculate Precision rating
class Precision_Score(Consider):
    def evaluate_model(self, y_true: np.ndarray, y_pred: np.ndarray) -> float:
        """
        Generates and returns a precision rating for a mannequin's predictions.

        """
        strive:
            precision = precision_score(y_true=y_true,y_pred=y_pred)
            logging.data("Precision rating: ",precision)
            return float(precision)
        besides Exception as e:
            logging.error("Error in calculation of precision_score",e)
            increase e

class F1_Score(Consider):
    def evaluate_model(self, y_true: np.ndarray, y_pred: np.ndarray):
        """
        Generates and returns an F1 rating for a mannequin's predictions.

        """
        strive:
            f1_scr = f1_score(y_pred=y_pred, y_true=y_true)
            logging.data("F1 rating: ", f1_scr)
            return f1_scr
        besides Exception as e:
            logging.error("Error in calculating F1 rating", e)
            increase e
Now that we’ve constructed the analysis methods, we are going to use them to guage the mannequin. Let�s implement the code in step evaluate_model.py within the steps folder. Right here, recall rating, accuracy rating, and precision rating are the methods we’re utilizing as metrics for evaluating the mannequin.
Let�s implement these in steps. Create a file named analysis.py in steps:
import logging
import pandas as pd
import numpy as np
from zenml import step
from src.evaluate_model import ClassificationReport, ConfusionMatrix, Accuracy_score
from typing import Tuple
from typing_extensions import Annotated
from sklearn.base import ClassifierMixin

@step(enable_cache=False)
def evaluate_model(
    mannequin: ClassifierMixin,
    X_test: pd.DataFrame,
    y_test: pd.Sequence
) -> Tuple[
    Annotated[np.ndarray,"confusion_matix"],
    Annotated[str,"classification_report"],
    Annotated[float,"accuracy_score"],
    Annotated[float,"precision_score"],
    Annotated[float,"recall_score"]
    ]:
    """
    Consider a machine studying mannequin's efficiency utilizing widespread metrics.
    """
    strive:
        y_pred =  mannequin.predict(X_test)


        precision_score_class = Precision_Score()
        precision_score = precision_score_class.evaluate_model(y_pred=y_pred,y_true=y_test)
        mlflow.log_metric("Precision_score ",precision_score)


        accuracy_score_class = Accuracy_score()
        accuracy_score = accuracy_score_class.evaluate_model(y_true=y_test, y_pred=y_pred)
        logging.data("accuracy_score:",accuracy_score)

        return accuracy_score, precision_score

    besides Exception as e:
        logging.error("Error in evaluating mannequin",e)
        increase e
Now, let�s implement this step within the pipeline. Replace the training_pipeline.py:
This code defines an evaluate_model step in a machine-learning pipeline. It takes a skilled classification mannequin (mannequin), impartial check information (X_test), and true labels for the check information (y_test) as enter. It then evaluates the mannequin�s efficiency utilizing widespread classification metrics and returns the outcomes, such because the�precision_score, and accuracy_score.
Now, �let�s implement this step within the pipeline. Replace the training_pipeline.py:
from zenml import pipeline


from steps.ingest_data import ingest_df
from steps.data_cleaning import cleaning_data
from steps.model_train import train_model
from steps.analysis import evaluate_model
import logging

#Outline a ZenML pipeline known as training_pipeline.
@pipeline(enable_cache=False)
def train_pipeline(data_path:str):
    '''
    Knowledge pipeline for coaching the mannequin.

    Args:
        data_path (str): The trail to the information to be ingested.
    '''
    #step ingesting information: returns the information.
    df = ingest_df(data_path=data_path)
    #step to scrub the information.
    X_train, X_test, y_train, y_test = cleaning_data(df=df)
    #coaching the mannequin
    mannequin = train_model(X_train=X_train,y_train=y_train)
    #Analysis metrics of information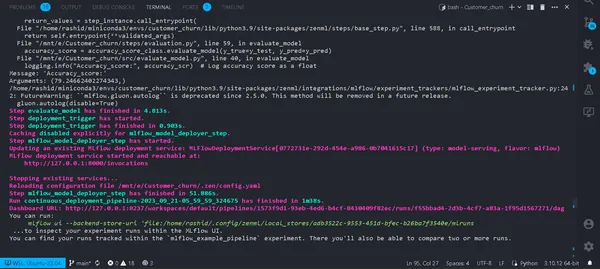
accuracy_score, precision_score = evaluate_model(mannequin=mannequin,X_test=X_test, y_test=y_test)That�s it. Now, we’ve accomplished the coaching pipeline. Run
python run_pipeline.py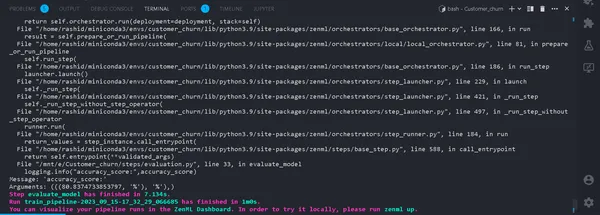
Within the Terminal. If it runs efficiently. Now that we’ve accomplished working a coaching pipeline domestically, it should appear to be this:
What’s an Experiment Tracker?
An experiment tracker is a software in machine studying used to report, monitor, and handle varied experiments within the machine studying improvement course of.
Knowledge scientists experiment with totally different fashions to get one of the best outcomes. So, they should preserve monitoring information and utilizing totally different fashions. Will probably be very laborious for them in the event that they report it manually utilizing an Excel sheet.
MLflow
MLflow is a priceless software for effectively monitoring and managing experiments in machine studying. It automates experiment monitoring, monitoring mannequin iterations, and related information. This streamlines the mannequin improvement course of and gives a user-friendly interface for visualizing outcomes.
Integrating MLflow with ZenML enhances experiment robustness and administration throughout the machine studying operations framework.
To arrange MLflow with ZenML, observe these steps:
- Set up MLflow integration:
- Use the next command to put in the MLflow integration:
zenml integration set up mlflow -y2.�Register the MLflow experiment tracker:
Register an experiment tracker in MLflow utilizing this command:
zenml experiment-tracker register mlflow_tracker --flavor=mlflow3.�Register a Stack:��
In ZenML, a Stack is a group of parts that outline duties inside your ML workflow. It helps arrange and handle ML pipeline steps effectively. Register a Stack with:
You will discover extra particulars within the documentation.
zenml model-deployer register mlflow --flavor=mlflow
zenml stack register mlflow_stack -a default -o default -d mlflow -e mlflow_tracker --set
This associates your Stack with particular settings for artifact storage, orchestrators, deployment targets, and experiment monitoring.
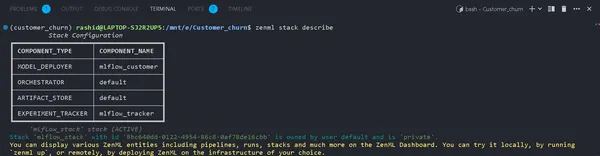
4. View Stack Particulars:
You possibly can view the parts of your Stack utilizing:
zenml stack describeThis shows the parts related to the �mlflow_tracker� Stack.
Now, let�s implement an experiment tracker within the coaching mannequin and consider the mannequin:
You possibly can see the identify of the parts as mlflow_tracker.
Setting Up ZenML Experiment Tracker
First, begin updating the train_model.py:
import logging
import mlflow
import pandas as pd
from src.training_model import LogisticReg
from sklearn.base import ClassifierMixin
from zenml import step
from .config import ModelName
#import
from zenml.shopper import Consumer


# Acquire the energetic stack's experiment tracker
experiment_tracker = Consumer().active_stack.experiment_tracker


#Outline a step known as train_model
@step(experiment_tracker = experiment_tracker.identify,enable_cache=False)
def train_model(
    X_train:pd.DataFrame,
    y_train:pd.Sequence,
    config:ModelName
    ) -> ClassifierMixin:
    """
    Trains the information based mostly on the configured mannequin
    Args:
        X_train: pd.DataFrame = Impartial coaching information,
        y_train: pd.Sequence = Dependent coaching information.

    """
    strive:
        mannequin = None
        if config.model_name == "logistic regression":
            #Routinely logging scores, mannequin and many others..
            mlflow.sklearn.autolog()
            mannequin = LogisticReg()
        else:
            increase ValueError("Mannequin identify will not be supported")

        trained_model = mannequin.prepare(X_train=X_train,y_train=y_train)
        logging.data("Coaching mannequin accomplished.")
        return trained_model

    besides Exception as e:
        logging.error("Error in step coaching mannequin",e)
        increase e
On this code, we arrange the experiment tracker utilizing mlflow.sklearn.autolog(), which mechanically logs all the main points in regards to the mannequin, making it simpler to trace and analyze experiments.
Within the analysis.py
from zenml.shopper import Consumer

experiment_tracker = Consumer().active_stack.experiment_tracker


@step(experiment_tracker=experiment_tracker.identify, enable_cache = False)
Working the Pipeline
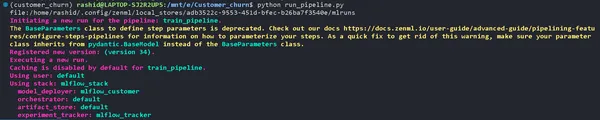
Replace your run_pipeline.py script as follows:
from pipelines.training_pipeline import train_pipeline
from zenml.shopper import Consumer
if __name__ == '__main__':
    #printimg the experiment monitoring uri
    print(Consumer().active_stack.experiment_tracker.get_tracking_uri())
    #Run the pipeline
    train_pipeline(data_path="/mnt/e/Customer_churn/information/WA_Fn-UseC_-Telco-Buyer-Churn.csv")
Copy it and paste on this command.
mlflow ui --backend-store-uri "--uri on the highest of "file:/house/ "Discover Your Experiments
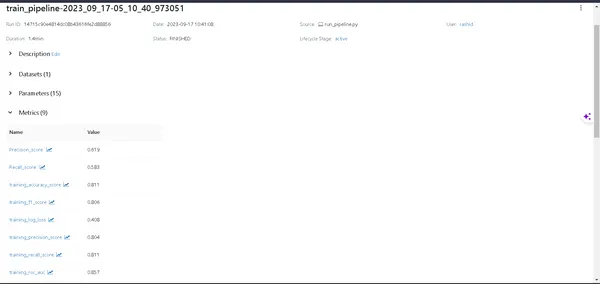
Click on the hyperlink generated by the above command to open the MLflow UI. Right here, you�ll discover a treasure trove of insights:
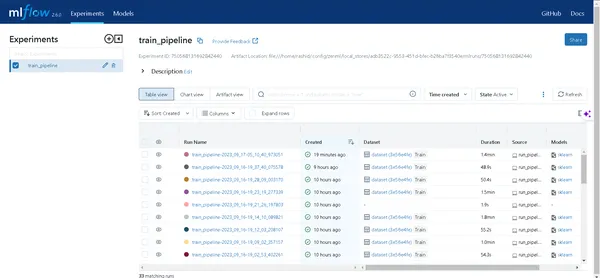
- Pipelines: Simply entry all of the pipelines you�ve run.
- Mannequin Particulars: Click on on a pipeline to uncover each element about your mannequin.
- Metrics: Dive into the metrics part to visualise your mannequin�s efficiency.
Now, you possibly can conquer your machine studying experiment monitoring with ZenML and MLflow!
Deployment
Within the subsequent part, we’re going to deploy this mannequin. That you must know these ideas:
a). Steady Deployment Pipeline
This pipeline will automate the mannequin deployment course of. As soon as a mannequin passes analysis standards, it�s mechanically deployed to a manufacturing setting. For instance, it begins with information preprocessing, information cleansing, coaching the information, mannequin analysis, and many others.
b). Inference Deployment Pipeline
The Inference Deployment Pipeline focuses on deploying machine studying fashions for real-time or batch inference. The Inference Deployment Pipeline makes a speciality of deploying fashions for making predictions in a manufacturing setting. For instance, it units up an API endpoint the place customers can ship textual content. It ensures the mannequin�s availability and scalability and screens its real-time efficiency. These pipelines are essential for sustaining the effectivity and effectiveness of machine-learning methods.�Now, we’re going to implement the continual pipeline.
Create a file known as deployment_pipeline.py within the pipelines folder.
import numpy as np
import json
import logging
import pandas as pd
from zenml import pipeline, step
from zenml.config import DockerSettings
from zenml.constants import DEFAULT_SERVICE_START_STOP_TIMEOUT
from zenml.integrations.constants import MLFLOW
from zenml.integrations.mlflow.model_deployers.mlflow_model_deployer import (
    MLFlowModelDeployer,
)
from zenml.integrations.mlflow.companies import MLFlowDeploymentService
from zenml.integrations.mlflow.steps import mlflow_model_deployer_step
from zenml.steps import BaseParameters, Output
from src.clean_data import FeatureEncoding
from .utils import get_data_for_test
from steps.data_cleaning import cleaning_data
from steps.analysis import evaluate_model
from steps.ingest_data import ingest_df


# Outline Docker settings with MLflow integration
docker_settings = DockerSettings(required_integrations = {MLFLOW})


#Outline class for deployment pipeline configuration
class DeploymentTriggerConfig(BaseParameters):
    min_accuracy:float = 0.92

@step
def deployment_trigger(
    accuracy: float,
    config: DeploymentTriggerConfig,
):
    """
    It set off the deployment provided that accuracy is larger than min accuracy.
    Args:
        accuracy: accuracy of the mannequin.
        config: Minimal accuracy thereshold.
    """
    strive:
        return accuracy >= config.min_accuracy
    besides Exception as e:
        logging.error("Error in deployment set off",e)
        increase e

# Outline a steady pipeline
@pipeline(enable_cache=False,settings={"docker":docker_settings})
def continuous_deployment_pipeline(
    data_path:str,
    min_accuracy:float = 0.92,
    staff: int = 1,
    timeout: int = DEFAULT_SERVICE_START_STOP_TIMEOUT
):

    df = ingest_df(data_path=data_path)
    X_train, X_test, y_train, y_test = cleaning_data(df=df)
    mannequin = train_model(X_train=X_train, y_train=y_train)
    accuracy_score, precision_score = evaluate_model(mannequin=mannequin, X_test=X_test, y_test=y_test)
    deployment_decision = deployment_trigger(accuracy=accuracy_score)
    mlflow_model_deployer_step(
        mannequin=mannequin,
        deploy_decision = deployment_decision,
        staff = staff,
        timeout = timeout
    )
ZenML Framework for Machine Studying Challenge
This code defines a steady deployment for a machine studying challenge utilizing the ZenML Framework.
1. Import Crucial libraries:�Importing the mandatory libraries for deployment of the mannequin.
2. Docker Settings: By configuring Docker settings to make use of with MLflow, Docker helps package deal and run these fashions constantly.
3. DeploymentTriggerConfig: It’s the class the place the minimal accuracy threshold is configured for a mannequin to deploy.
4. deployment_trigger: This step will return if the mannequin accuracy exceeds the minimal accuracy.
5. continuous_deployment_pipeline: This pipeline consists of a number of steps: ingesting information, cleansing information, coaching the mannequin, and evaluating the mannequin. And the mannequin will solely deploy if it meets the minimal accuracy threshold.
Subsequent, we’re going to implement the inference pipeline in deployment_pipeline.py
import logging
import pandas as pd
from zenml.steps import BaseParameters, Output
from zenml.integrations.mlflow.model_deployers.mlflow_model_deployer
import MLFlowModelDeployer
from zenml.integrations.mlflow.companies import MLFlowDeploymentService

class MLFlowDeploymentLoaderStepParameters(BaseParameters):
    pipeline_name: str
    step_name: str
    working: bool = True

@step(enable_cache=False)
def dynamic_importer() -> str:
    information = get_data_for_test()
    return information

@step(enable_cache=False)
def prediction_service_loader(
    pipeline_name: str,
    pipeline_step_name: str,
    working: bool = True,
    model_name: str = "mannequin",
) -> MLFlowDeploymentService:
    model_deployer = MLFlowModelDeployer.get_active_model_deployer()
    existing_services = model_deployer.find_model_server(
        pipeline_name=pipeline_name,
        pipeline_step_name=pipeline_step_name,
        model_name=model_name,
        working=working,
    )
    if not existing_services:
        increase RuntimeError(
            f"No MLflow prediction service deployed by the "
            f"{pipeline_step_name} step within the {pipeline_name} "
            f"pipeline for the '{model_name}' mannequin is presently "
            f"working."
        )
    return existing_services[0]

@step
def predictor(service: MLFlowDeploymentService, information: str) -> np.ndarray:
    service.begin(timeout=10)
    information = json.hundreds(information)
    prediction = service.predict(information)
    return prediction

@pipeline(enable_cache=False, settings={"docker": docker_settings})
def inference_pipeline(pipeline_name: str, pipeline_step_name: str):
    batch_data = dynamic_importer()
    model_deployment_service = prediction_service_loader(
        pipeline_name=pipeline_name,
        pipeline_step_name=pipeline_step_name,
        working=False,
    )
    prediction = predictor(service=model_deployment_service, information=batch_data)
    return prediction
This code units up a pipeline for making predictions utilizing a deployed machine studying mannequin via MLflow. It imports information, hundreds the deployed mannequin, and makes use of it to make predictions.
We have to create the operate get_data_for_test() in utils.py on the pipelines folder. So we are able to handle our code extra effectively.
import logging

import pandas as pd
from src.clean_data import DataPreprocessing, LabelEncoding


# Operate to get information for testing functions
def get_data_for_test():
    strive:
        df = pd.read_csv('./information/WA_Fn-UseC_-Telco-Buyer-Churn.csv')
        df = df.pattern(n=100)
        data_preprocessing = DataPreprocessing()
        information = data_preprocessing.handle_data(df)

        # Instantiate the FeatureEncoding technique
        label_encode = LabelEncoding()
        df_encoded = label_encode.handle_data(information)
        df_encoded.drop(['Churn'],axis=1,inplace=True)
        logging.data(df_encoded.columns)
        end result = df_encoded.to_json(orient="cut up")
        return end result
    besides Exception as e:
        logging.error("e")
        increase e
Now, let�s implement the pipeline we created to deploy the mannequin and predict on the deployed mannequin.
Create the run_deployment.py file in challenge listing:
import click on  # For dealing with command-line arguments
import logging
from typing import forged
from wealthy import print  # For console output formatting

# Import pipelines for deployment and inference
from pipelines.deployment_pipeline import (
continuous_deployment_pipeline, inference_pipeline
)
# Import MLflow utilities and parts
from zenml.integrations.mlflow.mlflow_utils import get_tracking_uri
from zenml.integrations.mlflow.model_deployers.mlflow_model_deployer import (
MLFlowModelDeployer
)
from zenml.integrations.mlflow.companies import MLFlowDeploymentService

# Outline constants for various configurations: DEPLOY, PREDICT, DEPLOY_AND_PREDICT
DEPLOY = "deploy"
PREDICT = "predict"
DEPLOY_AND_PREDICT = "deploy_and_predict"

# Outline a foremost operate that makes use of Click on to deal with command-line arguments
@click on.command()
@click on.possibility(
    "--config",
    "-c",
    kind=click on.Alternative([DEPLOY, PREDICT, DEPLOY_AND_PREDICT]),
    default=DEPLOY_AND_PREDICT,
    assist="Optionally you possibly can select to solely run the deployment "
    "pipeline to coach and deploy a mannequin (`deploy`), or to "
    "solely run a prediction towards the deployed mannequin "
    "(`predict`). By default each shall be run "
    "(`deploy_and_predict`).",
)
@click on.possibility(
    "--min-accuracy",
    default=0.92,
    assist="Minimal accuracy required to deploy the mannequin",
)
def run_main(config:str, min_accuracy:float ):
    # Get the energetic MLFlow mannequin deployer element
    mlflow_model_deployer_component = MLFlowModelDeployer.get_active_model_deployer()

    # Decide if the consumer needs to deploy a mannequin (deploy), make predictions (predict), or each (deploy_and_predict)
    deploy = config == DEPLOY or config == DEPLOY_AND_PREDICT
    predict = config == PREDICT or config == DEPLOY_AND_PREDICT

    # If deploying a mannequin is requested:
    if deploy:
        continuous_deployment_pipeline(
            data_path="/mnt/e/Customer_churn/information/WA_Fn-UseC_-Telco-Buyer-Churn.csv",
            min_accuracy=min_accuracy,
            staff=3,
            timeout=60
        )

    # If making predictions is requested:
    if predict:
        # Initialize an inference pipeline run
        inference_pipeline(
            pipeline_name="continuous_deployment_pipeline",
            pipeline_step_name="mlflow_model_deployer_step",
        )

    # Print directions for viewing experiment runs within the MLflow UI
    print(
        "You possibly can run:n "
        f"[italic green]    mlflow ui --backend-store-uri '{get_tracking_uri()}"
        "[/italic green]n ...to examine your experiment runs throughout the MLflow"
        " UI.nYou can discover your runs tracked throughout the "
        "`mlflow_example_pipeline` experiment. There you may additionally be capable of "
        "examine two or extra runs.nn"
    )

    # Fetch current companies with the identical pipeline identify, step identify, and mannequin identify
    existing_services = mlflow_model_deployer_component.find_model_server(
        pipeline_name = "continuous_deployment_pipeline",
        pipeline_step_name = "mlflow_model_deployer_step",
    )

    # Test the standing of the prediction server:
    if existing_services:
        service = forged(MLFlowDeploymentService, existing_services[0])
        if service.is_running:
            print(
                f"The MLflow prediciton server is working domestically as a daemon"
                f"course of service and accepts inference requests at: n"
                f"     {service.prediction_url}n"
                f"To cease the service, run"
                f"[italic green] zenml model-deployer fashions delete"
                f"{str(service.uuid)}'[/italic green]."
            )
        elif service.is_failed:
            print(
                f"The MLflow prediciton server is in a failed state: n"
                f" Final state: '{service.standing.state.worth}'n"
                f" Final error: '{service.standing.last_error}'"
            )
    else:
        print(
            "No MLflow prediction server is presently working. The deployment"
            "pipeline should run first to coach a mannequin and deploy it. Execute"
            "the identical command with the '--deploy' argument to deploy a mannequin."
        )

# Entry level: If this script is executed instantly, run the principle operate
if __name__ == "__main__":
    run_main()
This code is a command line script for managing and deploying the machine studying mannequin utilizing MLFlow and ZenMl.
Now, let�s deploy the mannequin.
Run this command in your terminal.
python run_deployment.py --config deploy
Now, we’ve deployed our mannequin. Your pipeline shall be efficiently run, and you’ll view them within the zenml dashboard.
python run_deployment.py --config predictInitiating the Prediction Course of
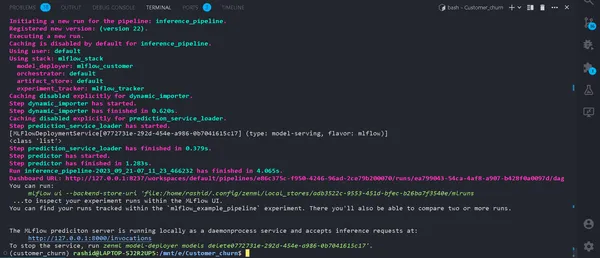
Now, our MLFlow prediction server is working.
We’d like an internet app to enter the information and see the outcomes. You should be questioning why we’ve to create a webapp from scratch.
Not likely. We’re going to use Streamlit, which is an open-source frontend framework that helps in constructing quick and straightforward frontend webapp for our machine studying mannequin.
Set up the Library
pip set up streamlitCreate a file named streamlit_app.py in your challenge listing.
import json
import logging
import numpy as np
import pandas as pd
import streamlit as st
from PIL import Picture
from pipelines.deployment_pipeline import prediction_service_loader
from run_deployment import foremost
def foremost():
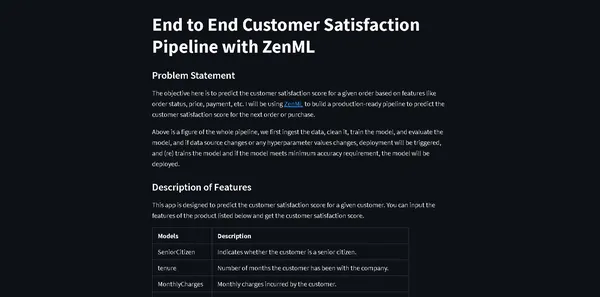
st.title("Finish to Finish Buyer Satisfaction Pipeline with ZenML")
st.markdown(
"""
#### Drawback Assertion
The target right here is to foretell the client satisfaction rating for a given order based mostly on options like order standing, worth, fee, and many others. I shall be utilizing [ZenML](https://zenml.io/) to construct a production-ready pipeline to foretell the client satisfaction rating for the following order or buy. """
)
st.markdown(
"""
Above is a determine of the entire pipeline, we first ingest the information, clear it, prepare the mannequin, and consider the mannequin, and if information supply modifications or any hyperparameter values modifications, deployment shall be triggered, and (re) trains the mannequin and if the mannequin meets minimal accuracy requirement, the mannequin shall be deployed.
"""
)
st.markdown(
"""
#### Description of Options
This app is designed to foretell the client satisfaction rating for a given buyer. You possibly can enter the options of the product listed under and get the client satisfaction rating.
| Fashions | Description |
| ------------- | - |
| SeniorCitizen | Signifies whether or not the client is a senior citizen. |
| tenure | Variety of months the client has been with the corporate. |
| MonthlyCharges | Month-to-month expenses incurred by the client. |
| TotalCharges | Whole expenses incurred by the client. |
| gender | Gender of the client (Male: 1, Feminine: 0). |
| Companion | Whether or not the client has a companion (Sure: 1, No: 0). |
| Dependents | Whether or not the client has dependents (Sure: 1, No: 0). |
| PhoneService | Whether or not the client has dependents (Sure: 1, No: 0). |
| MultipleLines | Whether or not the client has a number of strains (Sure: 1, No: 0). |
| InternetService | Sort of web service (No: 1, Different: 0). |
| OnlineSecurity | Whether or not the client has on-line safety service (Sure: 1, No: 0). |
| OnlineBackup | Whether or not the client has on-line backup service (Sure: 1, No: 0). |
| DeviceProtection | Whether or not the client has machine safety service (Sure: 1, No: 0). |
| TechSupport | Whether or not the client has tech assist service (Sure: 1, No: 0). |
| StreamingTV | Whether or not the client has streaming TV service (Sure: 1, No: 0). |
| StreamingMovies | Whether or not the client has streaming films service (Sure: 1, No: 0). |
| Contract | Sort of contract (One 12 months: 1, Different: 0). |
| PaperlessBilling | Whether or not the client has paperless billing (Sure: 1, No: 0). |
| PaymentMethod | Cost technique (Bank card: 1, Different: 0). |
| Churn | Whether or not the client has churned (Sure: 1, No: 0). |
"""
)
payment_options = {
2: "Digital test",
3: "Mailed test",
1: "Financial institution switch (computerized)",
0: "Bank card (computerized)"
}
contract = {
0: "Month-to-month",
2: "Two 12 months",
1: "One 12 months"
}
def format_func(PaymentMethod):
return payment_options[PaymentMethod]
def format_func_contract(Contract):
return contract[Contract]
show = ("male", "feminine")
choices = listing(vary(len(show)))
# Outline the information columns with their respective values
SeniorCitizen = st.selectbox("Are you senior citizen?",
choices=[True, False],)
tenure = st.number_input("Tenure")
MonthlyCharges = st.number_input("Month-to-month Expenses: ")
TotalCharges = st.number_input("Whole Expenses: ")
gender = st.radio("gender:", choices, format_func=lambda x: show[x])
Companion = st.radio("Do you may have a companion? ", choices=[True, False])
Dependents = st.radio("Dependents: ", choices=[True, False])
PhoneService = st.radio("Do you may have cellphone service? : ", choices=[True, False])
MultipleLines = st.radio("Do you Multiplines? ", choices=[True, False])
InternetService = st.radio("Did you subscribe for Web service? ", choices=[True, False])
OnlineSecurity = st.radio("Did you subscribe for OnlineSecurity? ", choices=[True, False])
OnlineBackup = st.radio("Did you subscribe for On-line Backup service? ", choices=[True, False])
DeviceProtection = st.radio("Did you subscribe for machine safety solely?", choices=[True, False])
TechSupport =st.radio("Did you subscribe for tech assist? ", choices=[True, False])
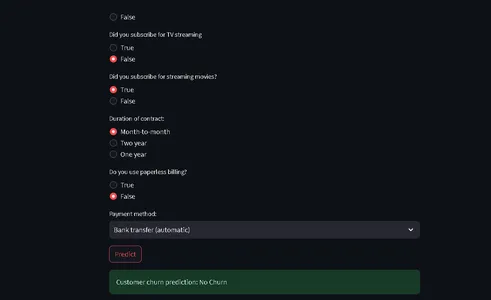
StreamingTV = st.radio("Did you subscribe for TV streaming", choices=[True, False])
StreamingMovies = st.radio("Did you subscribe for streaming films? ", choices=[True, False])
Contract = st.radio("Length of contract: ", choices=listing(contract.keys()), format_func=format_func_contract)
PaperlessBilling = st.radio("Do you employ paperless billing? ", choices=[True, False])
PaymentMethod = st.selectbox("Cost technique:", choices=listing(payment_options.keys()), format_func=format_func)
# You need to use PaymentMethod to get the chosen fee technique's numeric worth
if st.button("Predict"):
service = prediction_service_loader(
pipeline_name="continuous_deployment_pipeline",
pipeline_step_name="mlflow_model_deployer_step",
working=False,
)
if service is None:
st.write(
"No service might be discovered. The pipeline shall be run first to create a service."
)
run_main()
strive:
data_point = {
'SeniorCitizen': int(SeniorCitizen),
'tenure': tenure,
'MonthlyCharges': MonthlyCharges,
'TotalCharges': TotalCharges,
'gender': int(gender),
'Companion': int(Companion),
'Dependents': int(Dependents),
'PhoneService': int(PhoneService),
'MultipleLines': int(MultipleLines),
'InternetService': int(InternetService),
'OnlineSecurity': int(OnlineSecurity),
'OnlineBackup': int(OnlineBackup),
'DeviceProtection': int(DeviceProtection),
'TechSupport': int(TechSupport),
'StreamingTV': int(StreamingTV),
'StreamingMovies': int(StreamingMovies),
'Contract': int(Contract),
'PaperlessBilling': int(PaperlessBilling),
'PaymentMethod': int(PaymentMethod)
}
# Convert the information level to a Sequence after which to a DataFrame
data_point_series = pd.Sequence(data_point)
data_point_df = pd.DataFrame(data_point_series).T
# Convert the DataFrame to a JSON listing
json_list = json.hundreds(data_point_df.to_json(orient="data"))
information = np.array(json_list)
for i in vary(len(information)):
logging.data(information[i])
pred = service.predict(information)
logging.data(pred)
st.success(f"Buyer churn prediction: {'Churn' if pred == 1 else 'No Churn'}")
besides Exception as e:
logging.error(e)
increase e
if __name__ == "__main__":
foremost()This code defines a StreamLit will present frontend for predicting buyer churn in a telecom firm based mostly on buyer information and demographic particulars.
Customers can enter their data via a user-friendly Interface, and the code makes use of a skilled machine studying mannequin (deployed with ZenML and MLflow) to make predictions.
The expected result’s then exhibited to the consumer.
Now run this command:
?? be sure your prediction mannequin is working
streamlit run streamlit_app.pyClick on on the hyperlink.
That�s it; we’ve accomplished our challenge.
That�s it; we�ve efficiently wrapped up our end-to-end machine studying challenge, how professionals strategy the whole course of.
Conclusion
On this complete exploration of machine studying operations (MLOps) via the event and deployment of a buyer churn prediction mannequin, we’ve witnessed the transformational energy of MLOps in streamlining the machine studying lifecycle. From information assortment and preprocessing to mannequin coaching, analysis, and deployment, our challenge showcases the important position of MLOps in bridging the hole between improvement and manufacturing. As organizations more and more depend on data-driven decision-making, the environment friendly and scalable practices demonstrated right here spotlight the essential significance of MLOps in making certain the success of machine studying functions.
Key Takeaways
- MLOps (Machine Studying Operations) is pivotal in streamlining the end-to-end machine studying lifecycle, making certain environment friendly, dependable, and scalable operations.
- ZenML and MLflow are highly effective frameworks that facilitate the event, monitoring, and deployment of machine studying fashions in real-world functions.
- Correct information preprocessing, together with cleansing, encoding, and splitting, is foundational to constructing strong machine-learning fashions.
- Analysis metrics like accuracy, precision, recall, and F1 rating present a complete understanding of mannequin efficiency.
- Experiment monitoring instruments like MLflow improve collaboration and experimentation administration in information science tasks.
- Steady and inference deployment pipelines are essential for sustaining mannequin effectivity and availability in manufacturing environments.
Regularly Requested Questions
MLOPS means Machine Studying Operations is an end-to-end machine studying life cycle from improvement to Knowledge Assortment. It’s a set of practices for designing and automating the whole machine-learning cycle. It encompasses each stage, from the event and coaching of machine studying fashions to their deployment, monitoring, and ongoing upkeep. MLOps is essential as a result of it ensures the scalability, reliability, and effectivity of machine studying functions. It helps information scientists to create strong machine-learning functions that ship correct predictions.
MLOps and DevOps have comparable targets of streamlining and automating processes inside their respective domains. DevOps primarily facilities on software program improvement, the software program supply pipeline. It goals to speed up software program improvement, improve code high quality, and enhance deployment reliability. MLOps caters to the specialised wants of machine studying tasks, making it an important follow to leverage AI and information science.
It is a widespread error you’ll face within the challenge. Simply run
�zenml down�
then
�zenml disconnect�
once more run the pipeline. Will probably be resolved.
The media proven on this article will not be owned by Analytics Vidhya and is used on the Creator�s discretion.